


I was given a task by a customer this week to see the feasibility of sending a message to Microsoft Teams with a link to a Content Hub item when the status changes.
Obviously, my answer with Content Hub is always …

Even if that means I have moments of madness while doing it.
Now it didn’t seem to be a difficult task (The hardest task was formatting the link exactly as I wanted) and the architecture is described below. The process is started using a trigger in Content Hub to send a message to a service bus. Next, I have an Azure Logic App that is triggered by the service bus message and this talks to the team’s channel.
This could be accomplished in many ways, but I wanted something I could build and test quickly to show the customer.
How to do this yourself
You will need
- Content Hub instance
- Azure account
- Teams channel or chat
Step 1 – Service Bus Setup
Setup a new service bus (Microsoft Learn steps). I selected the consumption plan. I then created a new queue and noted down the name of the queue.

Important point to note you need to add a ‘Shared Access Policy’ to the service bus (not the queue at the level above). You will need the primary key for Content Hub and the Logic App so note it down.
Step 2 – Content Hub
We have two jobs here starting with creating an action. The new action will call the service bus and add a new message to your new queue.

Add the following: then click save
- Name – Whatever you want to call it, probably following your naming convention
- Type – Azure Service Bus
- Connection String – Primary key from SB that you noted in the previous step
- Destination Type – Queue
- Destination – Queue name that you created in the previous step
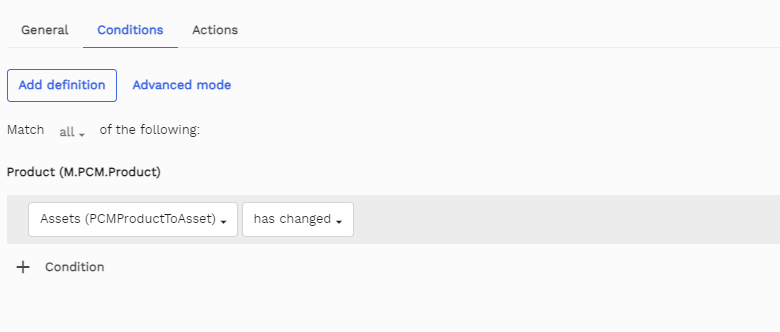
Save that then we need to add a trigger, this can be whatever you want and it needs to call the action you created above. For my example here it’s triggering whenever a product is updated with a new asset. The config is here:


Now update a product by adding a new asset and if this is working you should see a new message in the service bus explorer. If you go to the service bus explorer for your queue you should see a message like the one below
{
“saveEntityMessage”:{
“EventType”:”EntityUpdated”,
“TimeStamp”:”2024-02-14T12:02:49.185Z”,
“IsNew”:false,
“TargetDefinition”:”PCM.Product”,
“TargetId”:00000,
“TargetIdentifier”:”IDENTIFIER”,
“CreatedOn”:”2024-02-13T11:58:09.3468489Z”,
“UserId”:12345,
“Version”:17,
“ChangeSet”:{
“PropertyChanges”:[
{
“Culture”:”(Default)”,
“Property”:”Assets”,
“Type”:”ID”,
“OriginalValue”:”OldId”,
“NewValue”:”NewId”
}
],
“Cultures”:[
“(Default)”
],
“RelationChanges”:[
],
“inherits_security_original”:true,
“inherits_security”:true,
“is_root_taxonomy_item_original”:true,
“is_root_taxonomy_item”:true,
“is_path_root_original”:false,
“is_path_root”:false,
“is_system_owned_original”:false,
“is_system_owned”:false
}
},
“context”:{
}
}
Step 3 – Logic Apps
This next part is where the magic happens. You need to create a new logic app in the Azure portal. Then open the logic app designer. You will see a view like the following:

For this we are going to select the top option – ‘When a message was received in a Service Bus queue’.

The view will refresh and add the above option, click continue.

I already have a connection setup but add a new one.

Use the connection string from the service bus above and make sure the authentication type is set to ‘Access Key’. Next you need to add a new step.
Click on the new step button and filter to find what you want. I selected a Microsoft Teams action – ‘Post message to a chat or channel’.

You also need to setup a connection here. I wont show the steps but for me it gave a prompt to connect to Microsoft with my account that the Teams channel is located.
Select the new connection and then the following.
- Post as – Flow Bot
- Post in – Group chat
- Group chat – Name of chat
- Message – ‘Test Message’
Message
For the message part you need to get the id of the item that has been updated from the service bus queue. Start by changing to code view from the options above the design panel. Here you see code for the logic app.
Find the part called ‘messageBody’ and paste the following code in place of ‘Test Message’
“messageBody”: “<p>Message Bot – Product has been updated – <a href=\”CONTENTHUBINSTANCE/@{json(base64ToString(triggerBody()?[‘ContentData’]))?[‘saveEntityMessage’][‘TargetId’]}\”>Click here</a></p>”,
Replace CONTENTHUBINSTANCE with the url for the page of the product or asset. The json part above will get the TargetId and append it to the url.
Save your changes.
Now when a product is updated a teams message will be sent to the chat you connected to above.
Conclusion
Content Hub is so powerful it’s so easy to extend the platform. What I have done here is give a new way to notify clients to changes that are happening.
I really hope you find this helpful and it’s a simple way to do more.


Leave a Reply